Have you ever opened your fridge and felt overwhelmed right away? Containers stacked randomly, vegetables hidden in a basket, sauces tipping over, and something suspicious sitting at the back?
You’re not alone.
A structured fridge organisation plan can completely transform your kitchen routine. It helps you reduce food waste, keep groceries fresh longer, improve food safety, and save time every single day.
The best part? You don’t need fancy tools or a complete kitchen makeover. You need a clear, step-by-step fridge organisation plan, and that’s exactly what this guide will give you.
Why You Need a Proper Fridge Organisation Plan?
Before diving into the steps, let’s understand why following a dedicated fridge organisation plan makes such a difference.
- Reduces food waste: When you hide food behind other items, you’re less likely to notice it. A clear organisational system ensures everything stays visible and gets used on time.
- Saves money: Less waste means fewer unnecessary grocery purchases. A well-organised fridge naturally lowers your monthly food expenses.
- Improves food safety: Correct food placement prevents cross-contamination and reduces bacterial growth.
- Saves time during cooking: When ingredients are easy to find, meal preparation becomes quicker and stress-free.
- Makes grocery shopping smarter: When you know exactly what’s inside your fridge, you avoid buying duplicates.
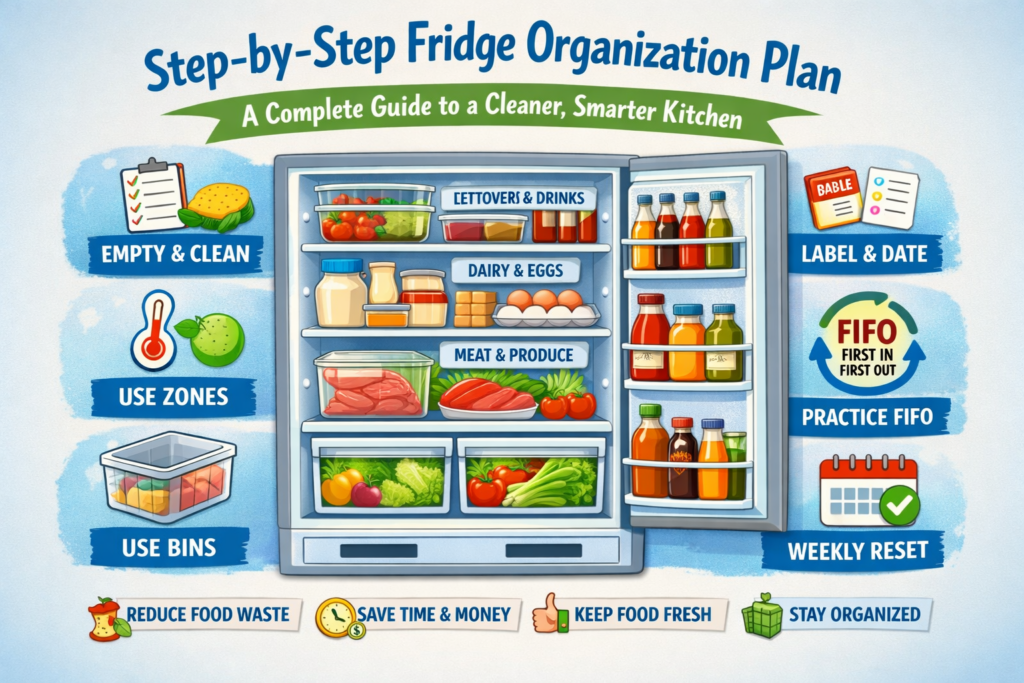
Step-by-Step Fridge Organisation Plan
Here are the fridge organisation plan steps you can follow to transform your refrigerator into a clean, efficient, and easy-to-maintain space:
Step 1: Empty the Fridge Completely
Every effective fridge organisation plan begins with a full reset.
Why This Step Is Important?
You can’t organize properly if you don’t see everything you have. Hidden clutter defeats the purpose of organizing.
What to Do?
- Remove all food items
- Check expiration dates carefully
- Discard spoiled, expired, or questionable items
- Place highly perishable food in a cooler temporarily.
It gives you a blank canvas and helps you clearly identify waste patterns.
Step 2: Deep Clean Before Reorganizing
A successful fridge organisation plan starts with a clean base.
Cleaning Checklist
- Remove shelves and drawers
- Wash the shelves and drawers with warm water and mild dish soap
- Wipe down interior walls and corners
- Clean rubber door seals
- Dry everything completely before reassembling.
Why Cleaning Matters?
- Prevents bad odors
- Reduces bacteria buildup
- Keeps food fresher for longer
- Improves overall hygiene.
Think of this as a fresh start for your refrigerator.
Step 3: Understand Fridge Temperature Zones
A smart fridge organisation plan uses temperature zones effectively, rather than randomly placing items.
Different areas inside your refrigerator maintain slightly different temperatures.
Top Shelves (Most Consistent Temperature)
Best for:
- Leftovers
- Ready-to-eat foods
- Drinks
- Yogurt and desserts.
These foods don’t require the coldest temperatures.
Middle Shelves
Best for:
- Dairy products
- Cheese
- Eggs (if not stored in original packaging)
- Packaged foods.
This zone offers stable cooling.
Bottom Shelf (Coldest Area)
Best for:
- Raw meat
- Fish
- Poultry.
Always store raw meat in sealed containers to prevent dripping and cross-contamination.
Crisper Drawers
- High humidity drawer: Leafy vegetables
- Low-humidity drawer: Fruits.
Humidity control extends freshness.
Door Shelves (Warmest Area)
Best for:
- Sauces
- Condiments
- Pickles
- Beverages.
Avoid storing milk or eggs here due to temperature fluctuations.
Understanding these zones is one of the most powerful steps in your fridge organisation plan.
Step 4: Categorize and Group Similar Items
Grouping items is the backbone of an efficient organisation plan.
Create Clear Categories
- Dairy section
- Meat section
- Vegetables section
- Leftovers shelf
- Snack area
- Sauces & condiments.
Why Categorizing Helps?
- Reduces searching time
- Keeps similar foods together
- Makes restocking easier.
When everything has a designated area, clutter naturally decreases.
Step 5: Use Clear Storage Bins and Dividers
Clear bins elevate your fridge organisation plan to the next level.
Benefits of Using Bins
- Contain spills
- Prevent small items from getting lost
- Keep shelves tidy
- Allow easy removal for cleaning.
Label Ideas:
- “Breakfast”
- “Meal Prep”
- “Kids’ Snacks”
- “Leftovers”
- “Healthy Options”
Bins create mini sections inside your fridge.
Step 6: Label and Date Everything
No fridge organisation plan is complete without labeling.
What to Label?
- Cooked meals
- Cut fruits
- Opened sauces
- Prepared ingredients.
Why Dating Is Important?
You will know exactly when you stored something and when you should use it.
This step significantly reduces food waste.
Step 7: Apply FIFO (First In, First Out)
Professional kitchens rely on FIFO, and so should your organisation plan.
How to Practice FIFO?
- Move older groceries to the front
- Place new items behind them
- Check dates weekly.
FIFO ensures nothing gets forgotten in the back.
Step 8: Avoid Overcrowding
Overcrowding ruins even the best fridge organisation plan.
Problems Caused by Overcrowding
- Blocks air circulation
- Causes uneven cooling
- Increases spoilage risk
- Makes items hard to access.
Ideal Fridge Capacity
Keep your refrigerator about 70–80% full for optimal airflow.
Step 9: Schedule a Weekly Fridge Reset
Consistency keeps your organisation plan working long-term.
10-Minute Weekly Routine
- Check expiration dates
- Discard spoiled food
- Wipe small spills
- Rearrange using FIFO
- Review leftovers for upcoming meals.
A small weekly effort prevents a major mess later.
Step 10: Customize Your Fridge Organisation Plan for Your Family
Every household is different. Your organisation plan should reflect your lifestyle.
For Families
- Keep kids’ snacks at eye level
- Store ready-to-eat meals upfront
- Create a dedicated leftovers section.
For Meal Preppers
- Use uniform containers
- Label meals clearly
- Arrange meals by day of the week.
For Small Refrigerators
- Use stackable containers
- Store vertically
- Remove bulky packaging.
The key is simplicity and consistency.
Common Mistakes That Ruin a Fridge Organisation Plan
Avoid these common errors:
- Storing hot food immediately
- Ignoring expiry dates
- Mixing raw and cooked food
- Not cleaning regularly
- Overbuying groceries.
Fixing these mistakes strengthens your entire fridge organisation plan.
Final Thoughts
A proper fridge organisation plan isn’t about perfection; it’s about building small, consistent habits that keep your kitchen running smoothly.
When your fridge is clean, categorized, labeled, and easy to navigate:
- Food lasts longer
- Waste decreases
- Cooking becomes easier
- Grocery shopping becomes smarter
Start with one shelf today. Clean it. Organize it. Label it.
One small step can completely transform your refrigerator and your daily routine.